Hands-on Tutorial: Introduction to Git and GitHub

This tutorial aims to provide an in-depth introduction to version control systems using git and GitHub. It is designed to equip you with the necessary skills to effectively use these tools, regardless of your experience level.
We will use the ⌨️ Command Line Interface (CLI) (i.e. Bash for Windows and Terminal in MacOS) to perform essential command line techniques. In case you want to learn how to use git with
GitHub Desktop, please refer to the slides below.
Git: An Overview
Git is a free and open-source version control software that was created by Linus Torvalds, the creator of Linux. It helps software developers track changes made to their code over time, making it easier to collaborate with others and revert changes when necessary.
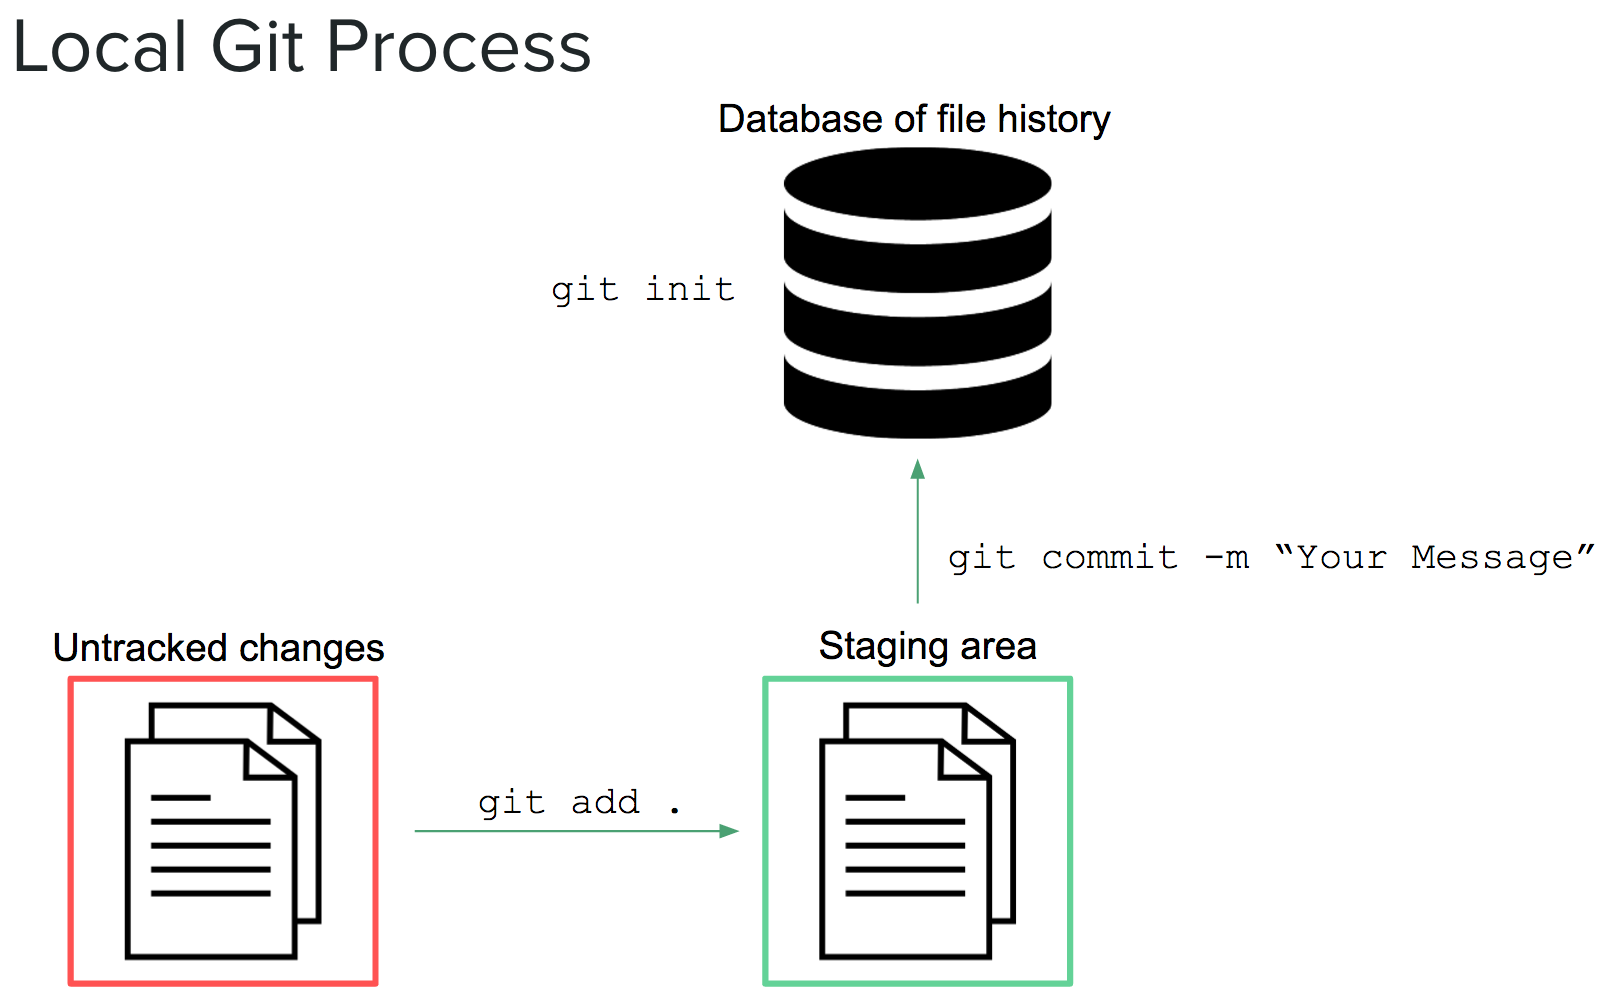
All files in a project directory, or a repository (repo for short), are tracked by a hidden .git file located in the root directory. You can create a new repository on your local machine by navigating to the directory where you want your project to live and typing the git init command.
Git allows you to roll back to a previous snapshot of your project called a commit. When you want to take a snapshot of your work, you’ll need to add the changes to your files to a staging area. You can think of a staging area (literally) like a staging area. The changes that you want to be included in your next snapshot need to be put on stage in order to be captured by the commit.
Each commit requires a message to describe what has changed. These commit messages should be brief but descriptive, allowing you (or others) to understand what has changed without having to read the code.
Here is a visual representation of the process:
Let’s delve into some common git commands. This is not a complete list — for a more comprehensive look at the git commands, check the
official Git documentation:
| Command | Description |
|---|---|
git init |
Initializes a new Git repository in the current directory. This creates a hidden .git directory which is used to track changes. This command is typically only used once at the start of a project. |
git status |
Provides information about any untracked files, changes not yet staged for commit, and changes that are staged but not yet committed. This command helps you understand the state of your project at any given time. |
git add FILE-NAME or git add . |
The git add command adds a file or all files (.) to the staging area. This signals to Git that these changes should be included in the next commit. |
git commit -m "Description" |
This command takes a snapshot of all changes in the staging area and saves them as a new commit in the repository. The -m flag is followed by a message that should briefly describe the changes made in this commit. |
The process described above happens on your local machine. This is perfect for solo projects, but if you want to collaborate with others or create a backup of your code, you’ll need to use GitHub.
GitHub: An Overview
GitHub is a platform that allows developers to host and share their Git repositories online. It’s a fantastic tool for collaboration, allowing multiple developers to work on the same project simultaneously without overwriting each other’s changes. It’s also a great way to backup your code — should your local machine ever fail, you can simply clone your repository from GitHub and continue where you left off. In addition to providing a great UI on top of a server that hosts your repositories, GitHub has a number of additional features such as issue tracking, wiki pages, and notifications that make it a great collaboration tool.
GitHub repositories are just like Git repositories, but with some added features. For example, GitHub allows for pull requests, where one developer can propose changes to a project that another developer can review and approve. GitHub also includes tools for project management, such as issue tracking and project boards.
One key thing to remember is that GitHub doesn’t just store a copy of your code files — it stores the entire history of changes to the files, thanks to Git. This allows other developers to view the files at an earlier point in time, or even revert the entire project back to an earlier state.
To Get Started with Git and GitHub
Here’s a step-by-step guide to get you started with Git and GitHub:
-
Create a GitHub Account: Visit github.com and register for an account.
-
Install Git: Depending on your operating system, download and install Git using one of the following methods:
- Windows users: Download and install Git for Windows.
- Mac users: Download and install
Git for MacOS or use Homebrew by typing
brew install gitin the Terminal.
-
Configure Git: Once Git is installed, you’ll need to configure it with your name and email address. This information is used to track who made each commit in a project. Open your Terminal or Command Prompt and type the following commands, replacing “FirstName LastName” and “ email@example.com” with your name and email:
# Enter YOUR NAME to set your name
git config --global user.name "FirstName LastName"

# Enter YOUR EMAIL to set your email. Make sure it is the email associated with your GitHub account!
git config --global user.email "email@example.com"
You can verify that the configuration worked by typing
git config --list. The output should include your name and email. Ensure you use the email associated with your GitHub account. This is important because Git will use this information when you work on a project.
See this article for more information on setting up GitHub.
-
Set up SSH Keys: SSH (Secure Shell) keys are a way to identify yourself to GitHub without needing to provide your username and password every time. They are a pair of encryption keys that work together to secure your connection. The public key is stored on GitHub and the private key is stored on your local machine.
Here are the steps to generate a new SSH key and add it to your GitHub account:
-
Check for existing SSH keys: Open your Terminal or Command Prompt and type
ls -al ~/.ssh. If you see files namedid_rsa.puborid_ed25519.pub, you already have an SSH key. If not, you’ll need to create one. -
Generate a new SSH key: In your Terminal or Command Prompt, type
ssh-keygen -t ed25519 -C "your email address", replacing “your email address” with the email you used to sign up for GitHub. PressEnterto accept the default file location. When asked to enter a passphrase, either type a secure passphrase or pressEnterto proceed without a passphrase. -
Add your SSH key to the ssh-agent: First, start the ssh-agent in the background by typing
eval "$(ssh-agent -s)". Then, add your SSH private key to the ssh-agent by typingssh-add ~/.ssh/id_ed25519(orssh-add ~/.ssh/id_rsaif you’re using an RSA key). -
Add your SSH key to your GitHub account: Type
cat ~/.ssh/id_ed25519.pub(orcat ~/.ssh/id_rsa.pubfor RSA keys) and pressEnterto display your public key. Select and copy the key. Then, go to the GitHub website, click your profile photo, select Settings, then SSH and GPG keys, then New SSH key. Paste your key into the “Key” field and click Add SSH key. -
Test your SSH connection: Go back to your Terminal or Command Prompt and type
ssh -T git@github.com. If you see a message saying"You've successfully authenticated, but GitHub does not provide shell access", then everything is working!
For more information on SSH keys, check out the GitHub guide for SSH keys or the Software Carpentry guide.
Workflow Example
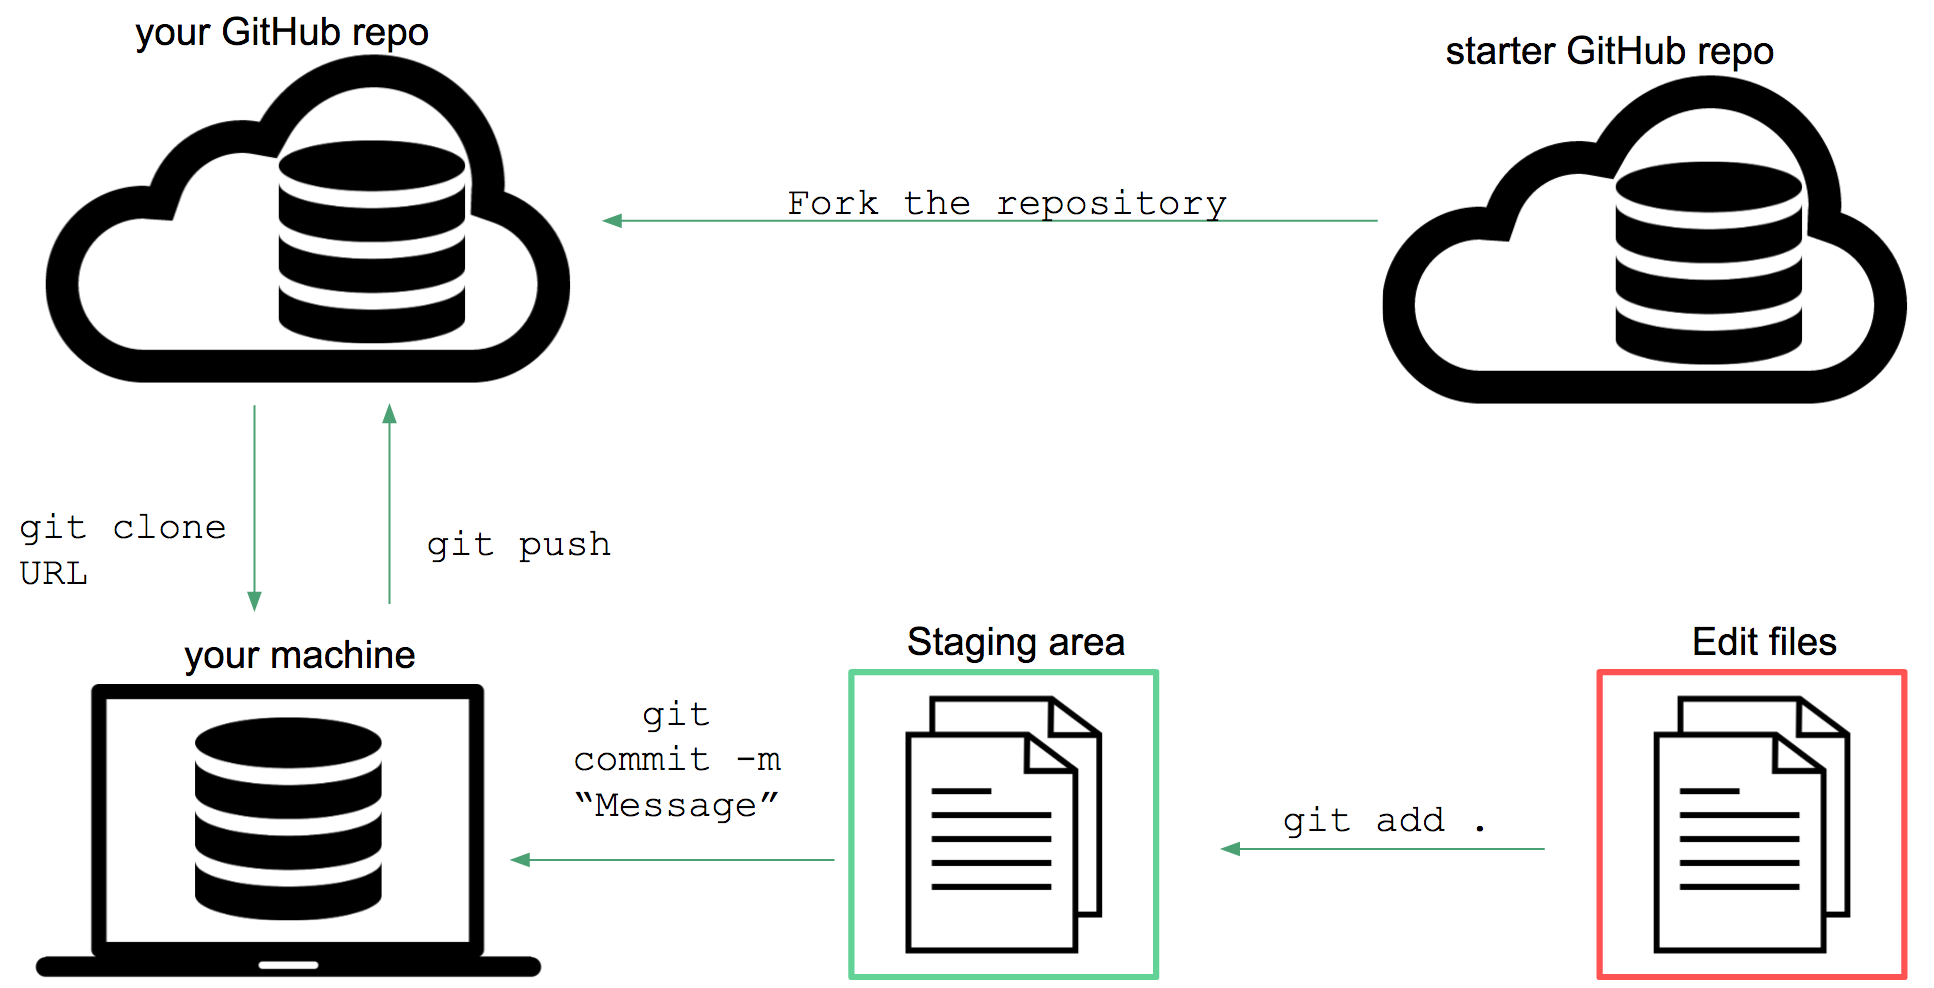
Here is one example of a workflow you may choose when working on a project. Let’s imagine that there’s a repository online that you want to use as a starting point for a project. First, you may want your own cloud copy of a repository on GitHub. In order to start working on the files, you’ll need to get them on your computer (they’re still only in the cloud). To do so, you will clone your repository to your machine. This will create a local copy of the files as well as their entire history on your local machine. We’ll use the terminal to clone the repository, but we need to get some information about it first. To get the URL location of the repository, click the Clone or Download button, then click on the clipboard icon to copy the URL to your clipboard:
Then, on your terminal, you could use the git clone command described below. Here is a diagram of the full process:
Collaborating with Git and GitHub
Now that we’ve covered the basics of Git and GitHub, let’s take a look at how they can be used for collaboration.
Let’s imagine you find a repository on GitHub that you’d like to contribute to. The first step is to create your own copy of the repository on GitHub, known as a fork. This gives you a version of the project that you have full control over, allowing you to make changes without affecting the original project.
Once you have forked the repository, you’ll want to clone it to your local machine. This creates a copy of the project files on your computer, allowing you to work on the project even when you’re offline. To clone a repository, navigate to the main page of the repository on GitHub, click the “Clone or download” button, and copy the URL that appears. Then, open your Terminal or Command Prompt, navigate to the directory where you want the project to live, and type git clone, followed by the URL you copied.
Now that you have a local copy of the project, you can start making changes. Remember to commit your changes frequently with clear, descriptive commit messages. This will make it easier for others to understand what you’ve done.
When you’re ready to share your changes with others, you’ll need to push your commits to GitHub. This uploads your changes to the GitHub repository, making them available to others. To push your changes, open your Terminal or Command Prompt, navigate to your project directory, and type git push origin main, replacing “master” with the name of the branch you want to push.
Finally, to propose that your changes be merged into the original project, you can create a pull request. To do this, navigate to the main page of the original repository on GitHub, click the “Pull requests” tab, then click the “New pull request” button. Select your fork on the right-hand side, review the changes, then click the “Create pull request” button. The project owner will be able to review your changes and decide whether to merge them into the project.
Here are some additional git commands that allow you to interact easily with GitHub:
| Command | Description |
|---|---|
git clone REPO-URL |
Creates a new copy of a source repository, usually hosted on a remote server. Use this when you want to clone a GitHub repository. This command creates a new subdirectory named after the source repository. |
git push origin main |
Pushes all commits on the main branch made since the last push to another repository (origin), typically across the network (e.g., to GitHub). |
git pull |
Pulls all commits made since the last pull from another repository, and attempts to merge those changes into your current files. This is useful when collaborating with others, as it allows you to incorporate their changes into your project. |
git config |
Configure your GitHub account. You should run git config --global user.name "Your Full Name" and git config --global user.email your-github-email to initially set up. |
🖥️ Git Commands Cheat Sheet
Set configuration values for your username and email
git config --global user.name YOUR NAME
git config --global user.email YOUR EMAIL
Set default branch to main
git config --global init.default branch main
Get help on a command
git help COMMAND
git COMMAND -h
Initialize a new git repository
git init
Clone a repository
git clone REPOSITORY URL
Add a file to the staging area
git add FILE
Add all file changes to the staging area
git add --all
git add -A
git add .
Check the unstaged changes
git diff
Commit the staged changes
git commit -m "MESSAGE"
Reset staging area to the last commit
git reset
Check the state of the working directory and the staging area
git status
Remove a file from the index and working directory
git rm FILENAME
Rename a file
git mv (OLD NAME) (NEW NAME)
List the commit history
git log
List all the local branches
git branch
Create a new branch
git branch BRANCH NAME
Rename the current branch
git branch -m NEW BRANCH NAME
Delete a branch
git branch -d BRANCH NAME
Switch to another branch
git switch BRANCH NAME
Merge specified branch into the current branch
git merge BRANCH NAME
Create a connection to a remote repository
git remote add (NAME) (REPOSITORY URL)
Push the committed changes to a remote directory
git push (REMOTE) (BRANCH)
Download the content from a remote repository
git pull REMOTE
📚 RESOURCES
-
Official Git web site: https://www.git-scm.com/
-
Official GitHub.com web site: https://github.com/
-
Git and GitHub.com cheat sheet: https://education.github.com/git-cheat-sheet-education.pdf
-
Git Reference Manual: http://git-scm.com/docs
-
Git Overview Book: http://git-scm.com/book/en/v2
-
Sample ignore files: https://github.com/github/gitignore
-
How can I learn more about Markdown languages?
Javed Ali
Water Resources Engineer & Climate Data Scientist
Experienced Water Resources Engineer and Climate Data Scientist focused on multi-hazard risk assessment, climate risk modeling, and developing science-informed data-driven solutions for resilient water systems, infrastructure and communities.